Manual
Documentation Menu
UI overview
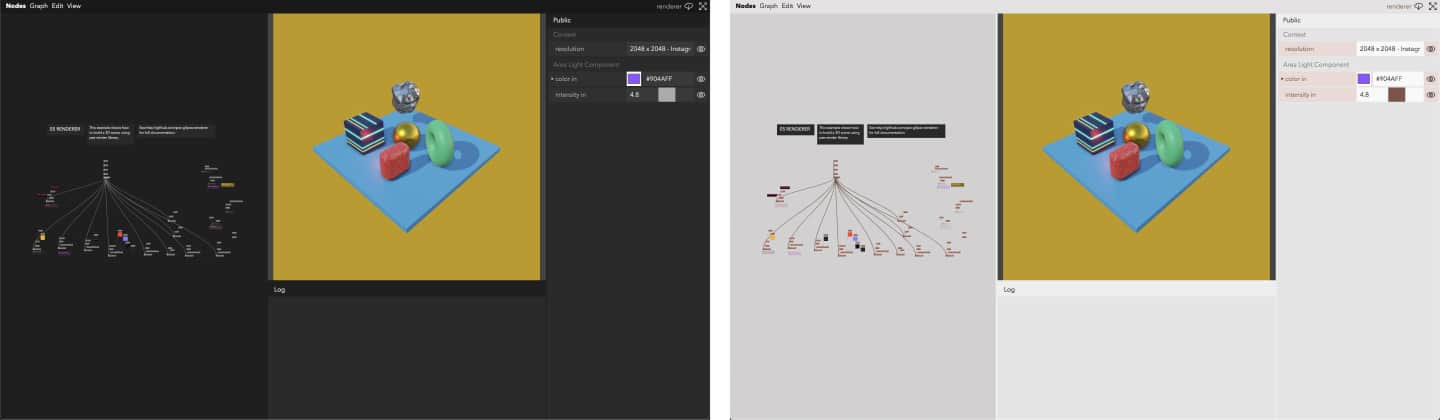
Below is the typical development environment of a Nodes project:
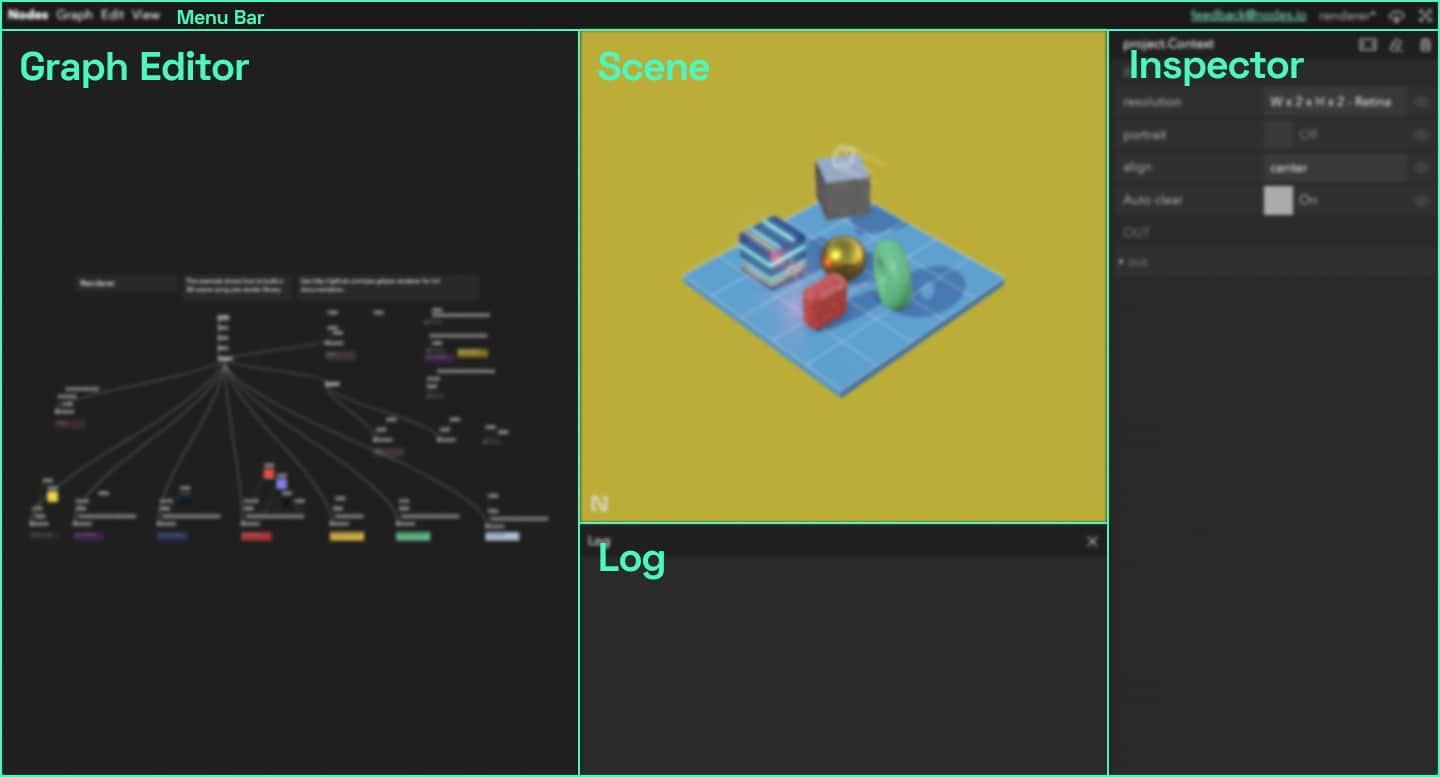
- Graph Editor: contains the visual representation of a graph, where all node manipulation happens
- Scene: a container usable for visualisation, whether with DOM, 2D Canvas, WebGL or any Web API
- Inspector: a panel where nodes parameters and connections are displayed and can be updated
- Log: a space to log data from nodes
- Menu Bar: an access for all the editing, viewing and formatting features
It will appear after opening a project, and its dependencies are installed and bundled. If the dashboard window is closed, it can be reopened or focused again with File > Open Dashboard (Cmd/Ctrl+T).
Layouts and resizing
Nodes comes with a few layout options accessible from the Menu Bar by visiting View > Choose Layout (Cmd/Ctrl+Shift+L).

The edges of the Graph Editor, Canvas and Log can also be dragged to resize and change the proportions of each section on screen.
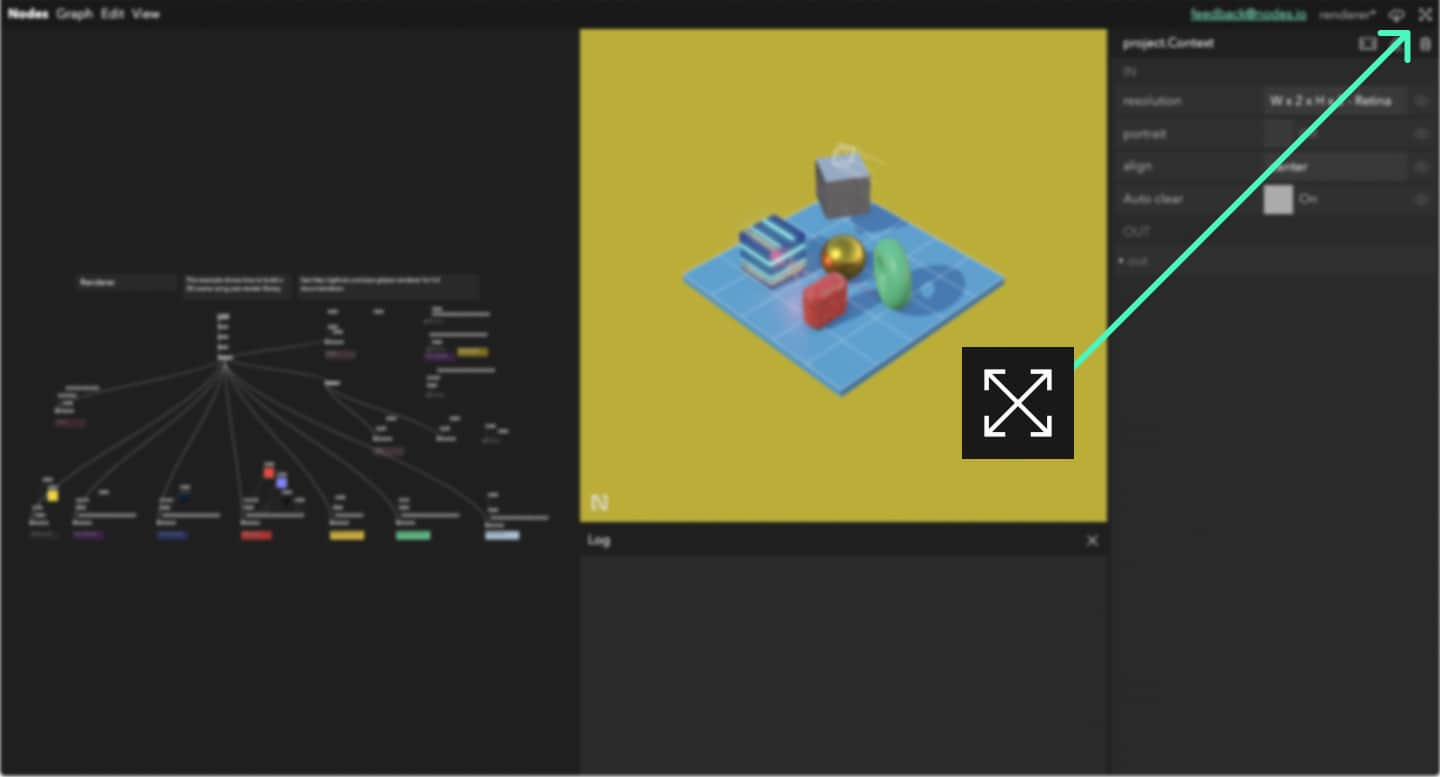
Fullscreen
Enter and leave the fullscreen mode by pressing the icon in the top left of the window, or by pressing the f key.
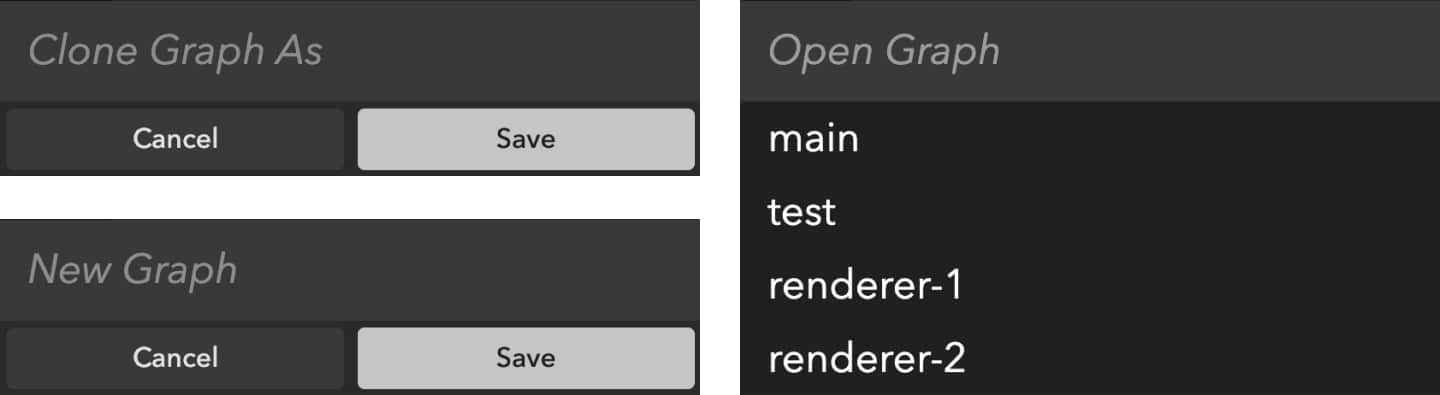
Graph open/save/clone/delete
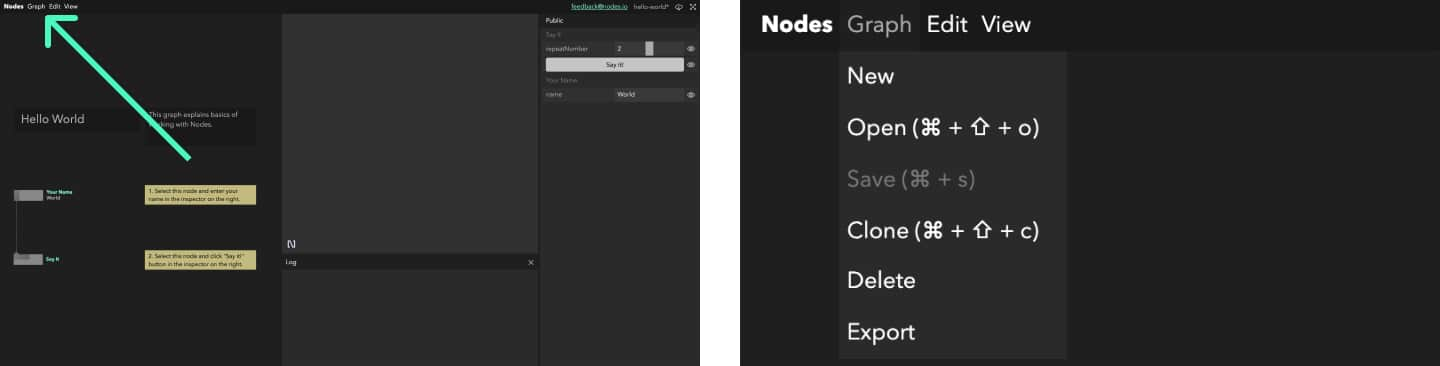
Opening (Cmd/Ctrl+Shift+O), Saving (Cmd/Ctrl+S), Cloning (Cmd/Ctrl+Shift+C) and Deleting graph actions are accessed from the Menu Bar under the Graph dropdown.
Graph Editor
Navigating the graph editor
To move the infinite canvas of the graph around, hold Space and click to drag. Use the mouse wheel to zoom in and out. Graph navigation can also be done with keyboard arrows (see Keyboard Shortcuts section below).
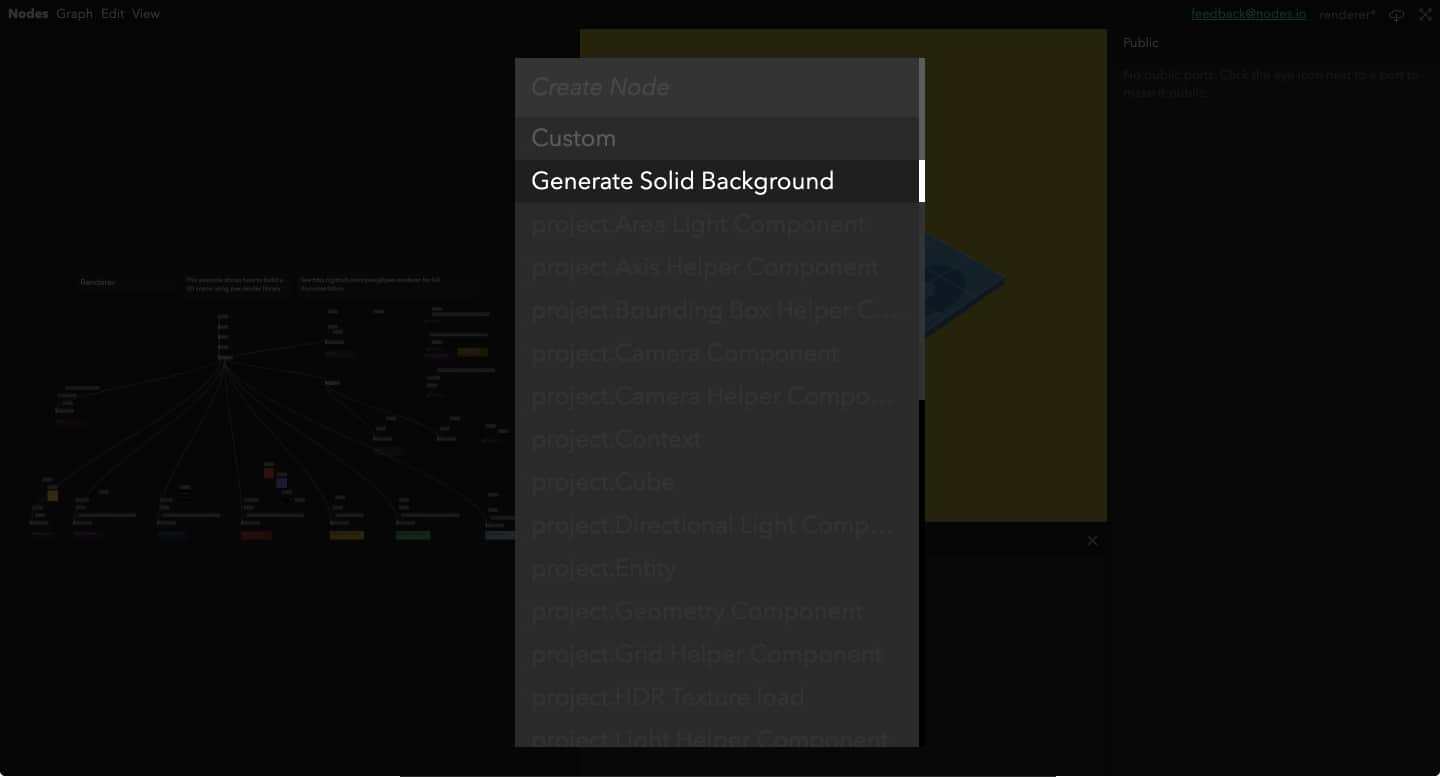
Creating nodes
New nodes are created by double clicking on the Graph Editor and selecting a template name from the modal choices. The default template (Custom) will create an empty node ready for one to start adding custom code.
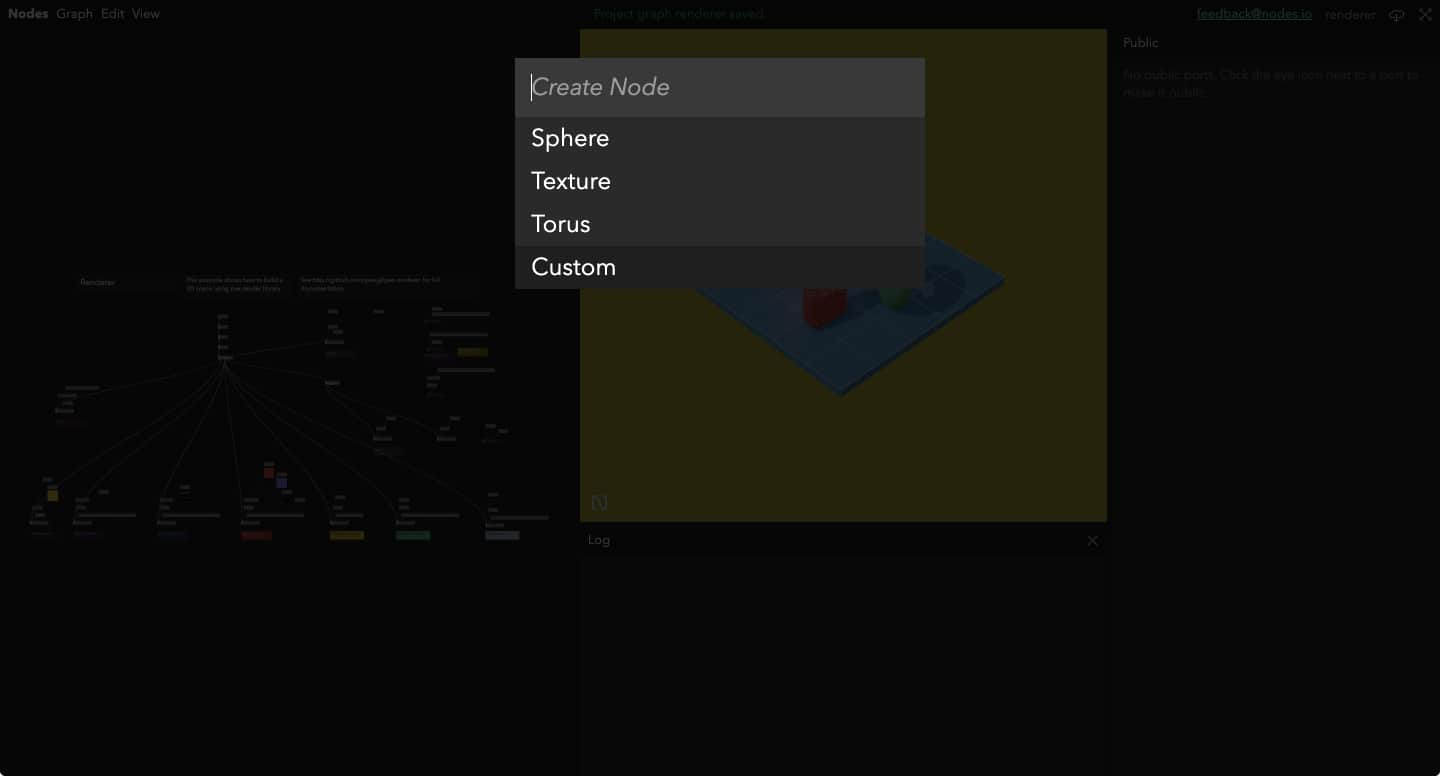
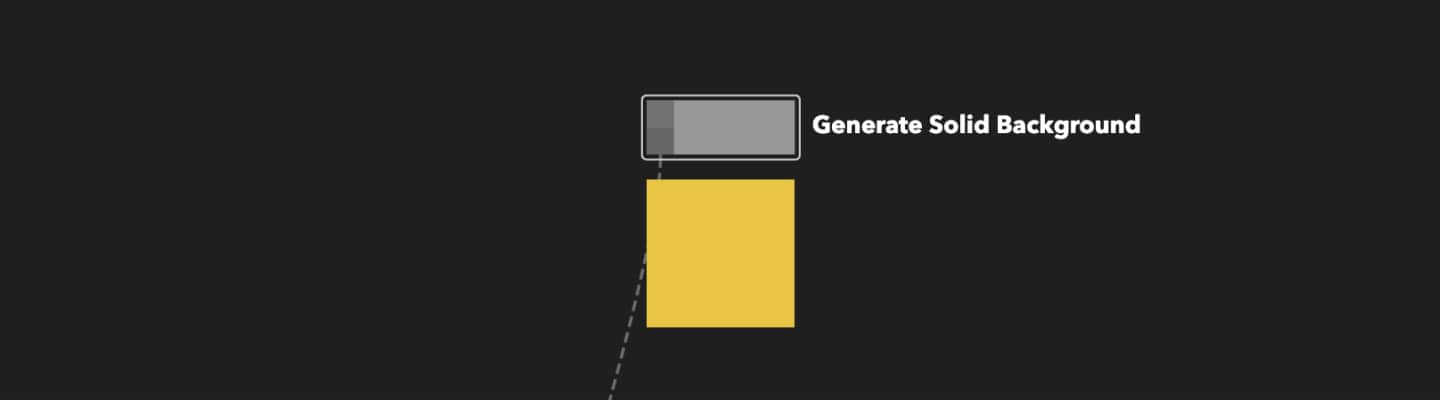
There are 4 nodes states:
- Active (Light grey): the code in this node is running without any error.
- Inactive (Dark grey): the node contains a trigger that hasn’t triggered recently.
- Warning (Yellow border): a parameter on this node is receiving a value that doesn’t match its declared type (type mismatch).
- Error (Red border): the node has an error and won’t function properly (missing dependency, syntax or compilation error).

Selecting the node will show warnings and errors details in the inspector.
Creating comments
Graph comments are created using the Alt+LMB (Left Mouse Button). They can be used as generic title blocs, area blocs, sticky note, separator and more. Their colours, font size and dimensions are customisable.
Moving nodes and comments
Nodes and comments can be moved around the canvas by clicking and dragging with LMB.
Connecting and Disconnecting
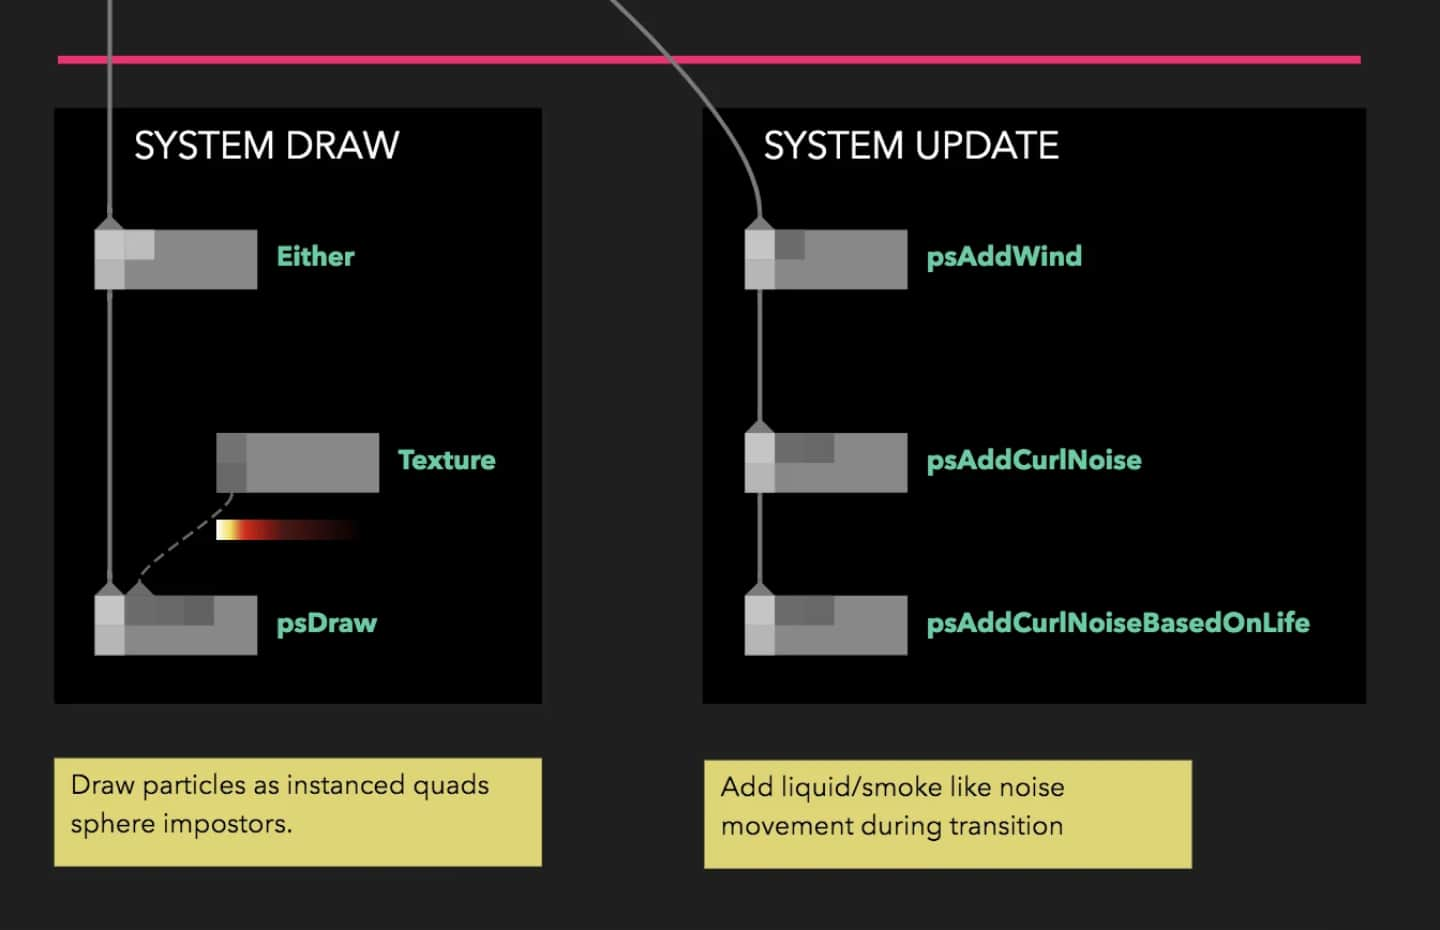
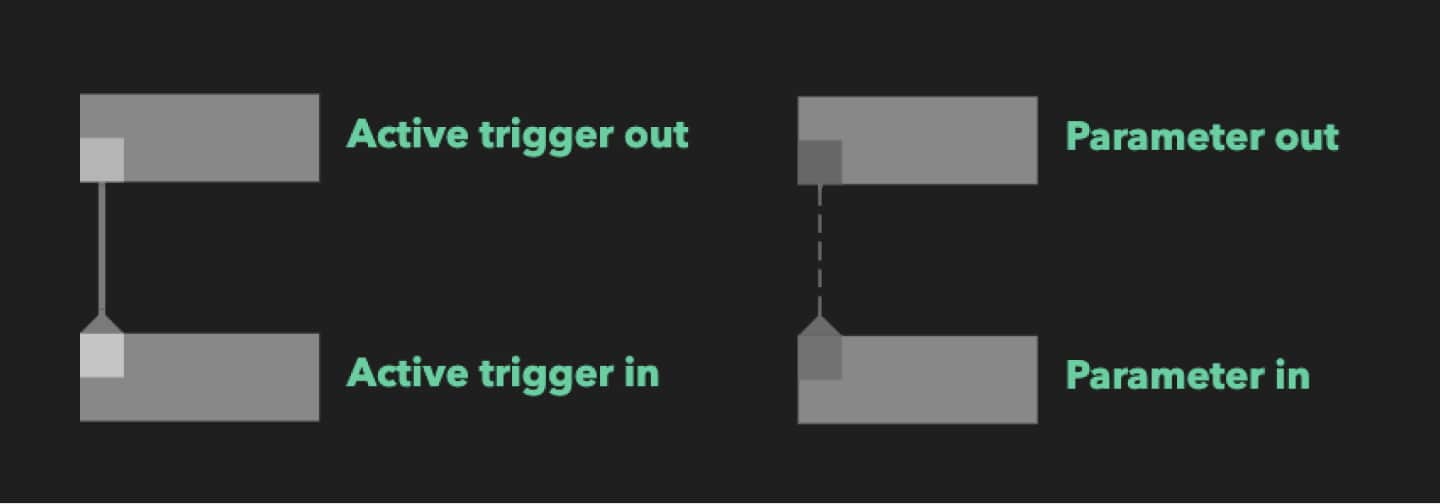
Nodes ports can be connected by clicking down LMB and dragging from an out port to and in port and vice versa. Connected parameters show as a dotted line while connected triggers show as a solid line.
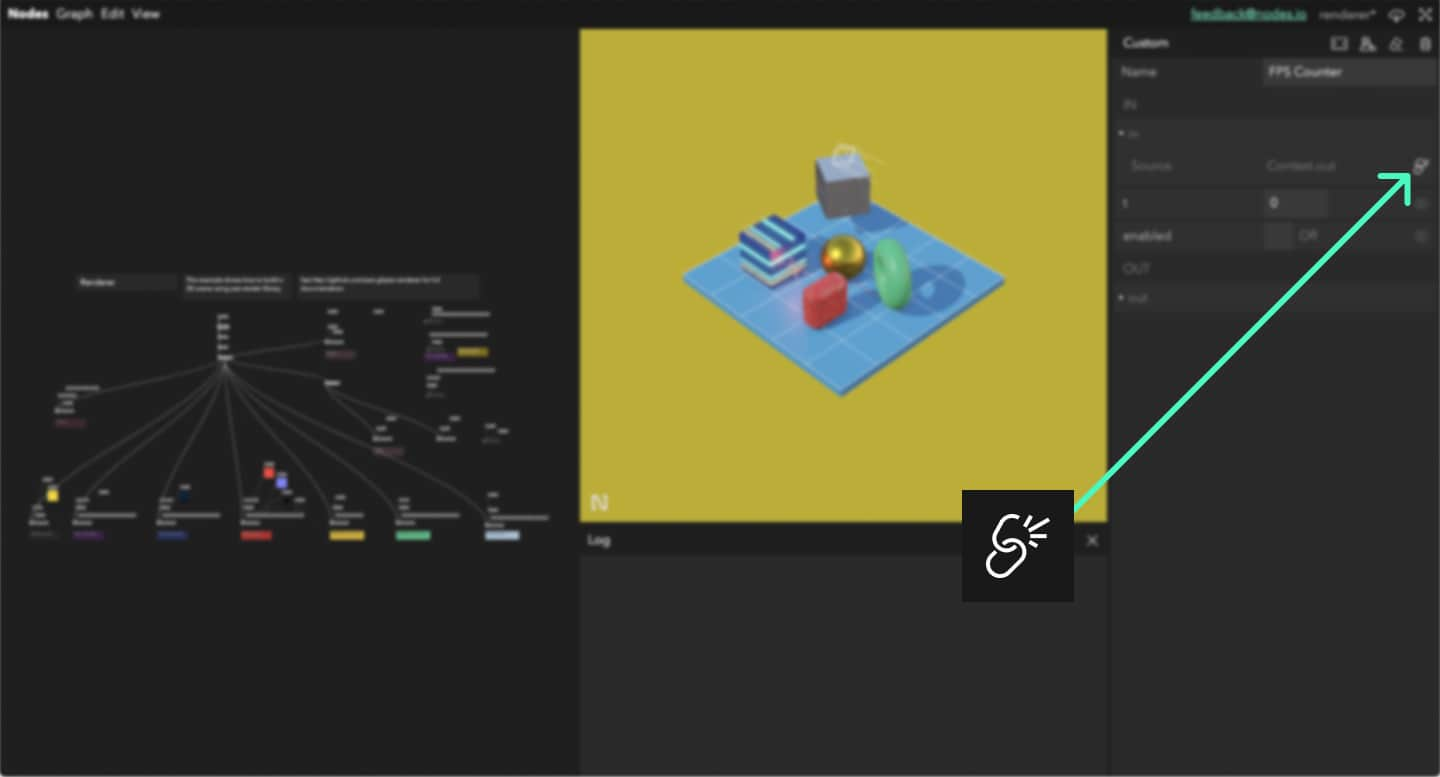
To disconnect a node’s port, hold Shift while clicking on a connected port and dragging outside of its box. Alternatively, click on the broken link icon next to a port in the Inspector.
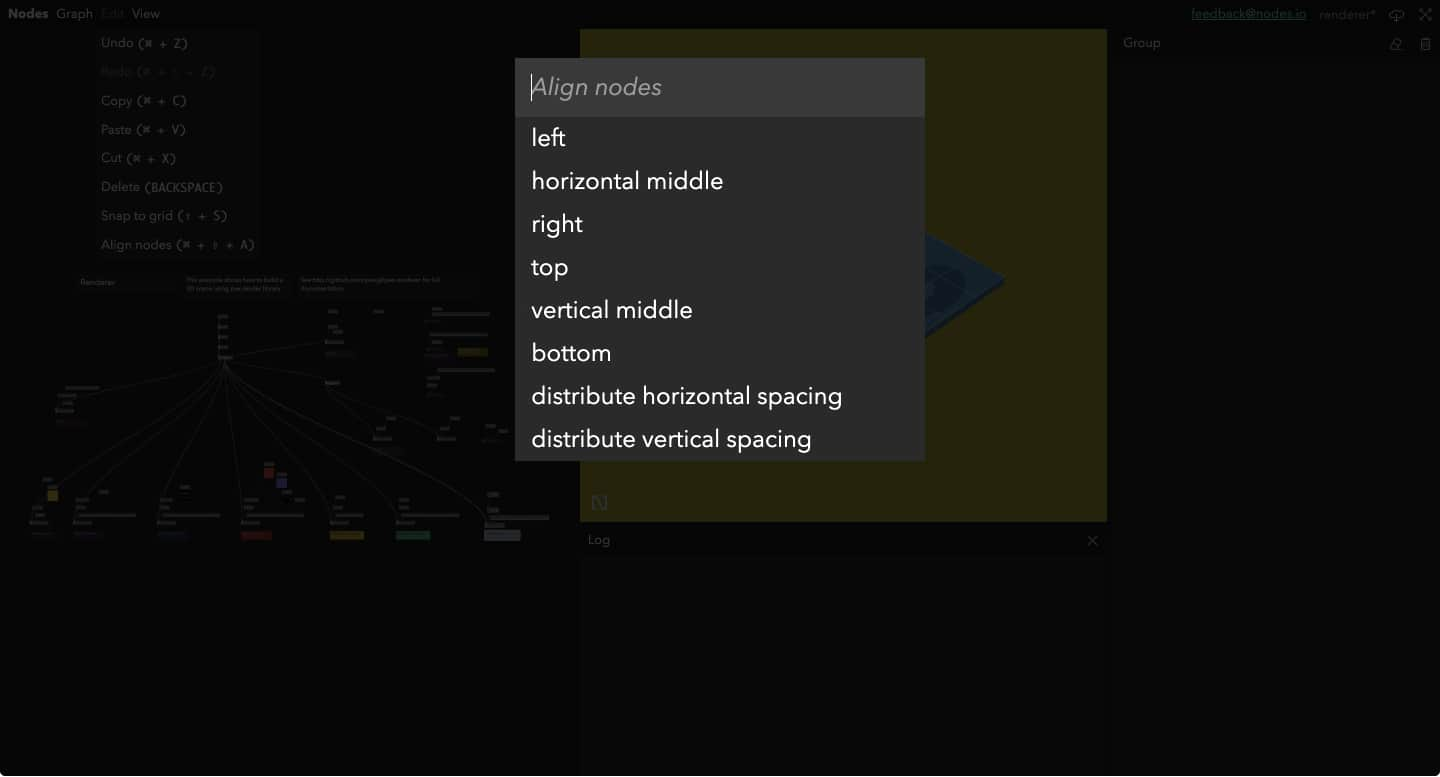
Aligning nodes
Select multiple nodes by holding LMB to drag a box around them and open the align options via Edit > Align nodes (Cmd/Ctrl+Shift+A).
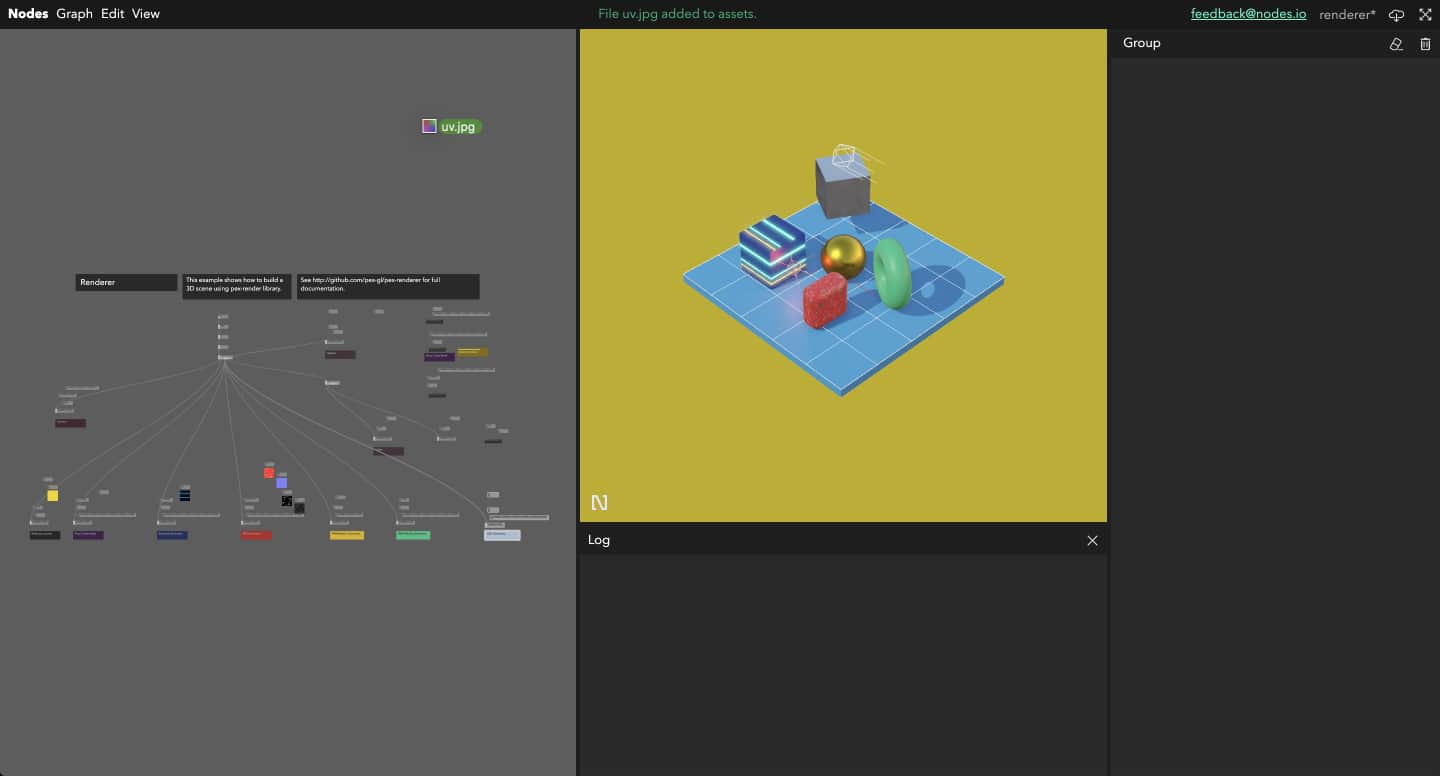
Assets
Drag assets directly onto the Graph Editor to save them in the assets/ folder. A list of all the assets is accessible in ports declared with the assets type and can be filtered adding a filter options (eg. node.in('name', '', { type: 'asset', filter: ".jpg" })). When manually adding files or folders to the assets folder, click on Nodes > Refresh asset list or Nodes > Reload.
Inspector
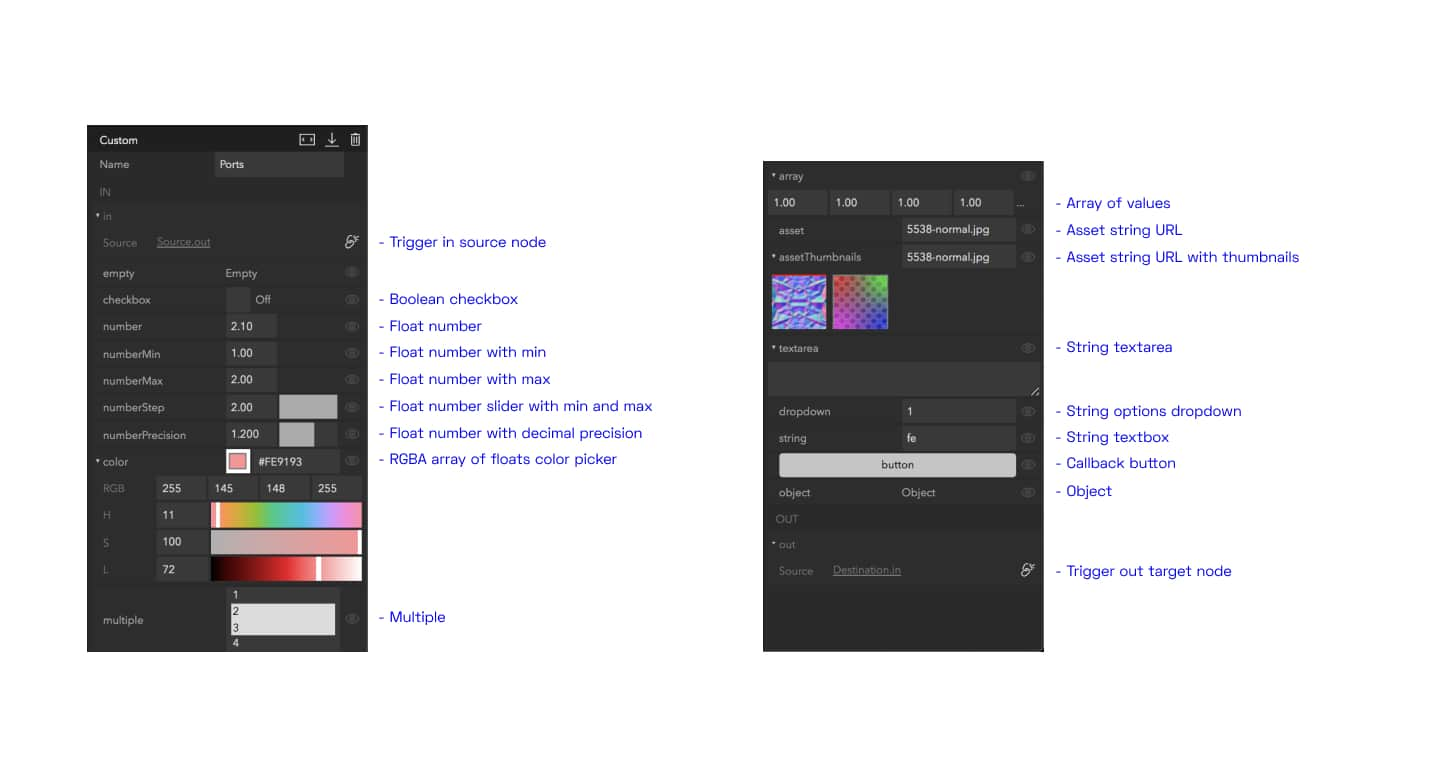
Basic parameters
Below is a list of all the different port types. They can be updated like any other html input.
See API Reference for a detailed list of port data types.
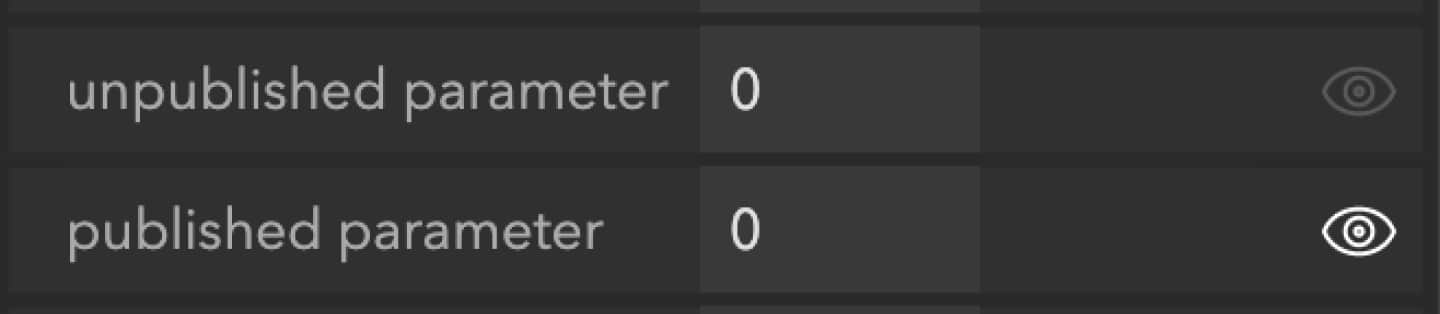
Publishing parameters
By default, ports can only be seen in the Inspector while a node is selected. To make ports visible at all time when no nodes are selected and whilst in full screen mode, publish them by pressing the eye icon on the far left of the port row in the Inspector.
Editing nodes
Changing nodes code
To edit nodes, double click on a node in the Graph Editor, or press Enter when a node is selected: this will open the code editor. Press Escape to close the code editor.
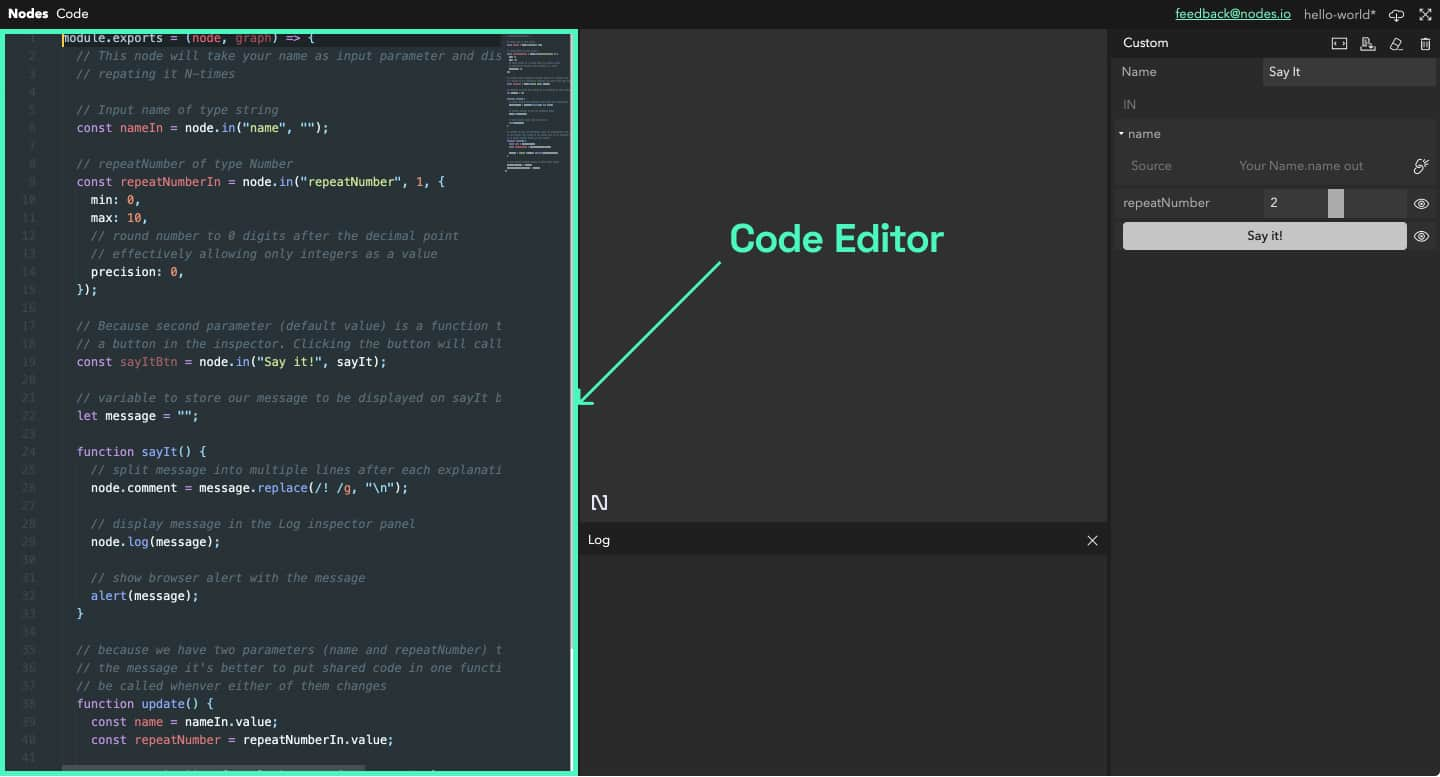
Compiling nodes
When making changes within a node, the code changes aren’t executed until the nodes are compiled. Press Shift+Enter to compile the changes then Escape to close the code editor. When a node has been edited but not compiled yet, the bar at the bottom of the editor will be yellow. After a node has been compiled, the bar turns green unless an error in the code occurred in which case it will be red. The results of editing a node’s code are not applied until it is compiled.

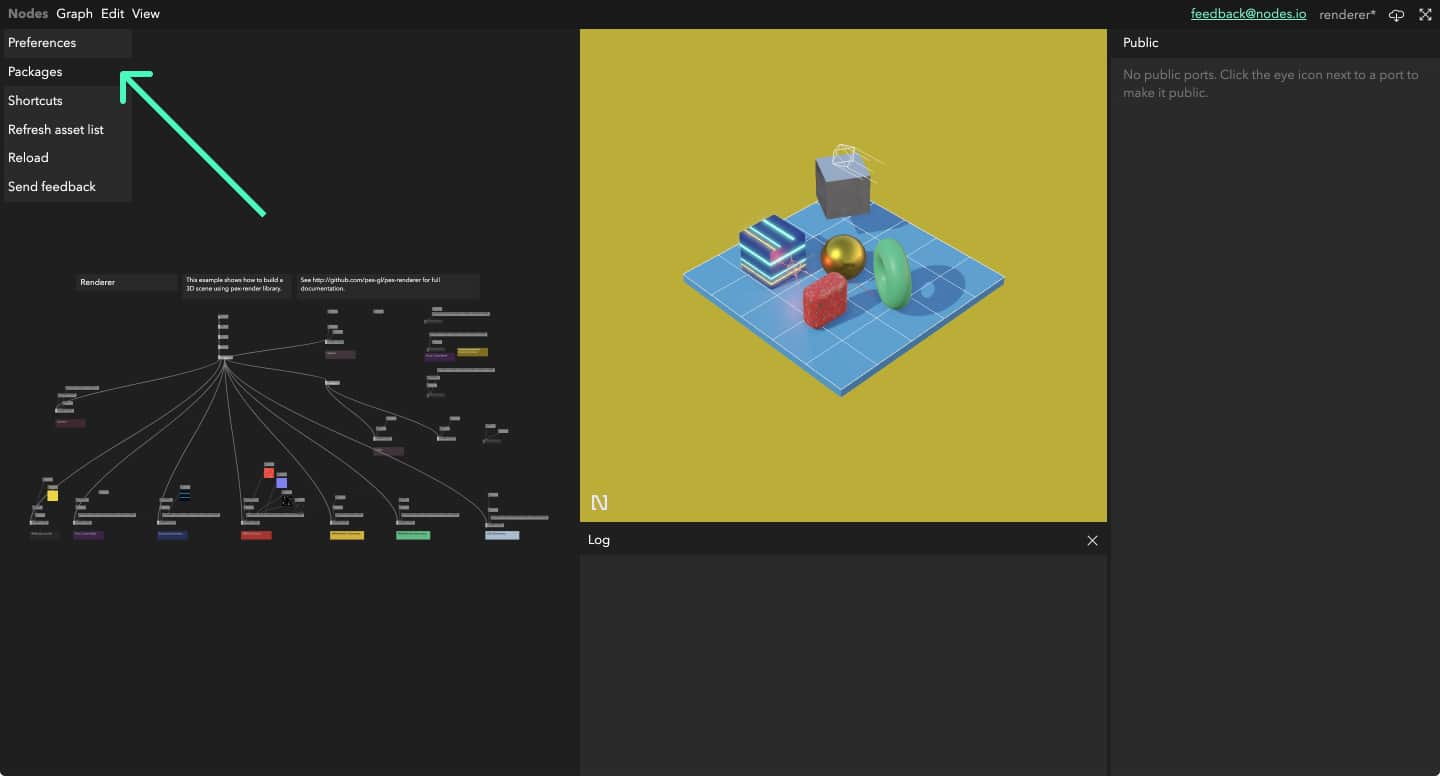
Installing packages
To use packages from npm in Nodes, they need to be installed in the project. This can be done via the package manager UI accessible in the Menu Bar (Nodes > Packages) where a list of all the packages currently installed and requirable (const { doSomething } = require('dependency')) is shown.
Press the Add button, type the name of the package in the text box that appears then press Save. Currently, after the package is installed, a reload is necessary (Nodes > Reload or Cmd/Ctrl+R). Install a specific version of a package by changing latest to any other valid syntax for npm install (5.14.2, next, github:org/package-name#5h4-1-h45h, etc.).
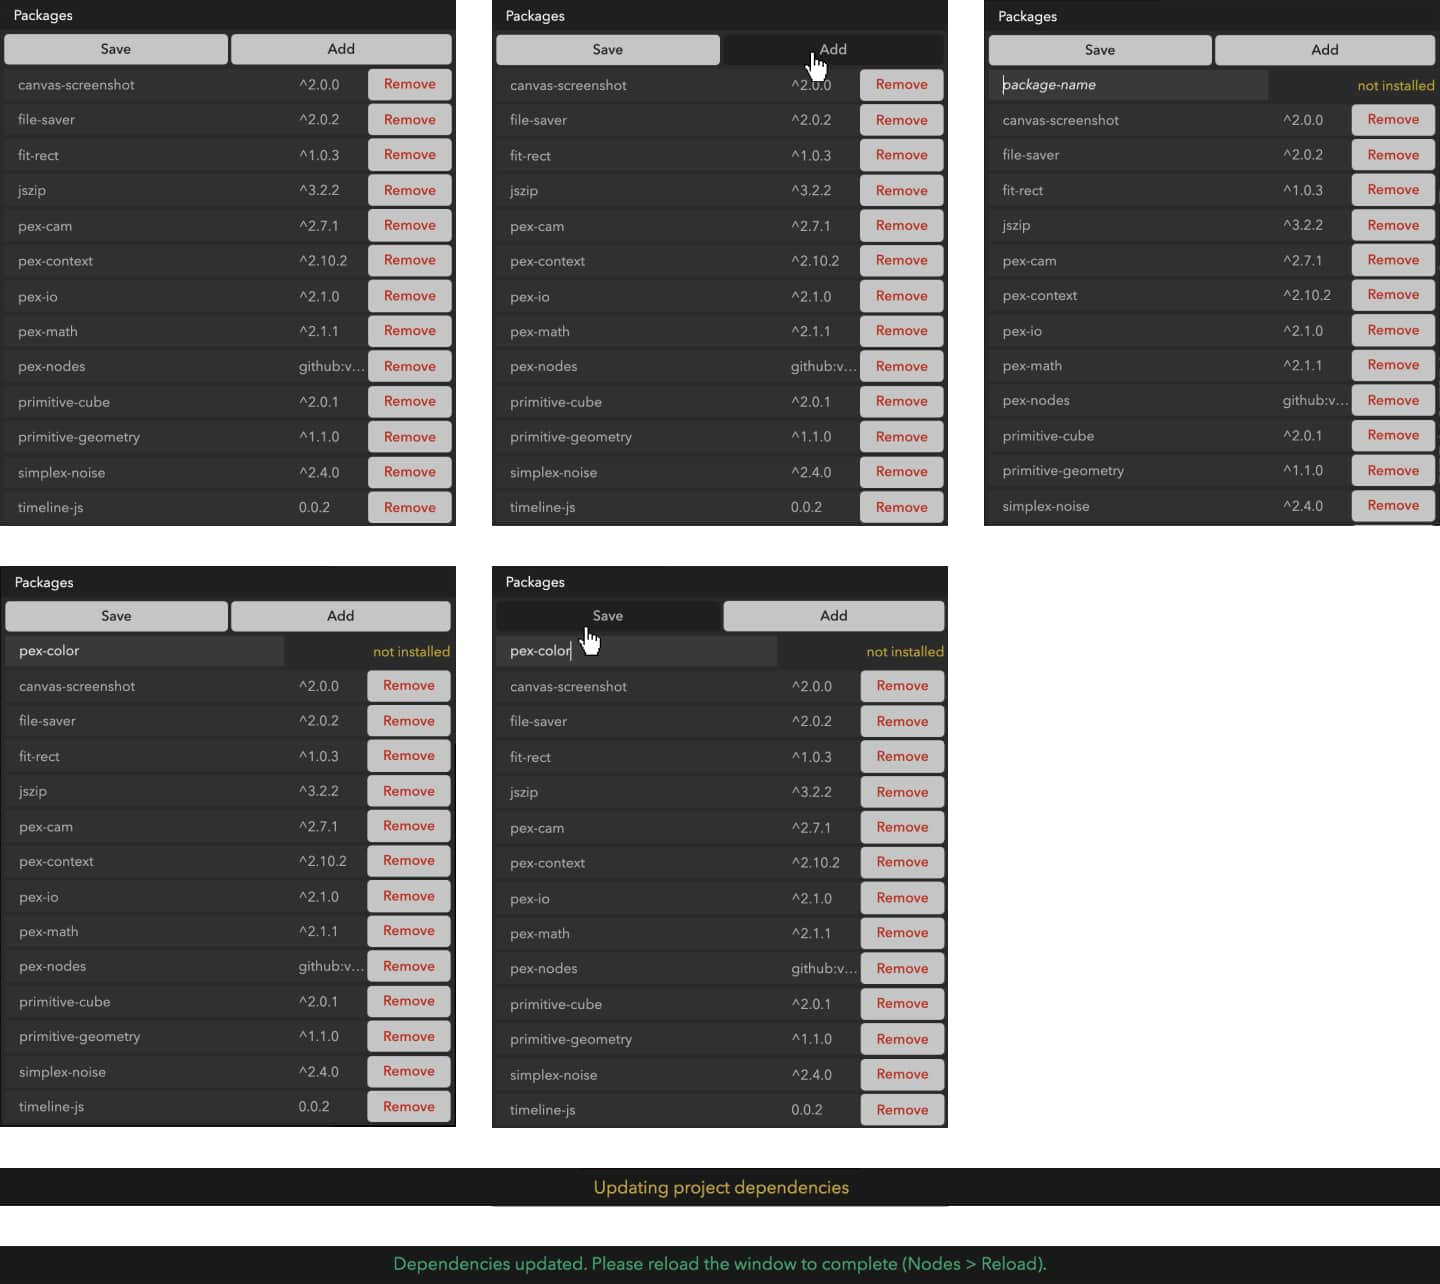
In the same fashion, press the trash icon to Remove a package and then Save.
Packages can also be manually installed via terminal but this will still require reloading the project window (Nodes > Reload or Cmd/Ctrl+R).
Template nodes
Nodes are designed to be reusable. When using a particular piece of functionality many times, it is a good idea to make it into a template node. Template nodes are special nodes that are shared between the different graphs of a project. They hold the same code and, as a result, are equipped with identical ports.
To create a template node, select a node with an isolated behaviour and press the Save node(s) as template button at the top of the Inspector.
The template node will now appear in the list of nodes available after double clicking on the Graph Editor.
You may also notice that the name of the node in the graph editor is now a different colour, to show it is a template node.
Modifying the code of a template node and compiling it will convert a node back to custom and will tie the new node to the currently open graph. The previous template node will still be available in other graphs.
To apply the modifications back to all the graphs containing the previous template node, click on the Save node(s) as template button again and overwrite it (template nodes having unique names).
Template nodes are per project, and can be used across multiple graphs. Custom nodes are per graph.
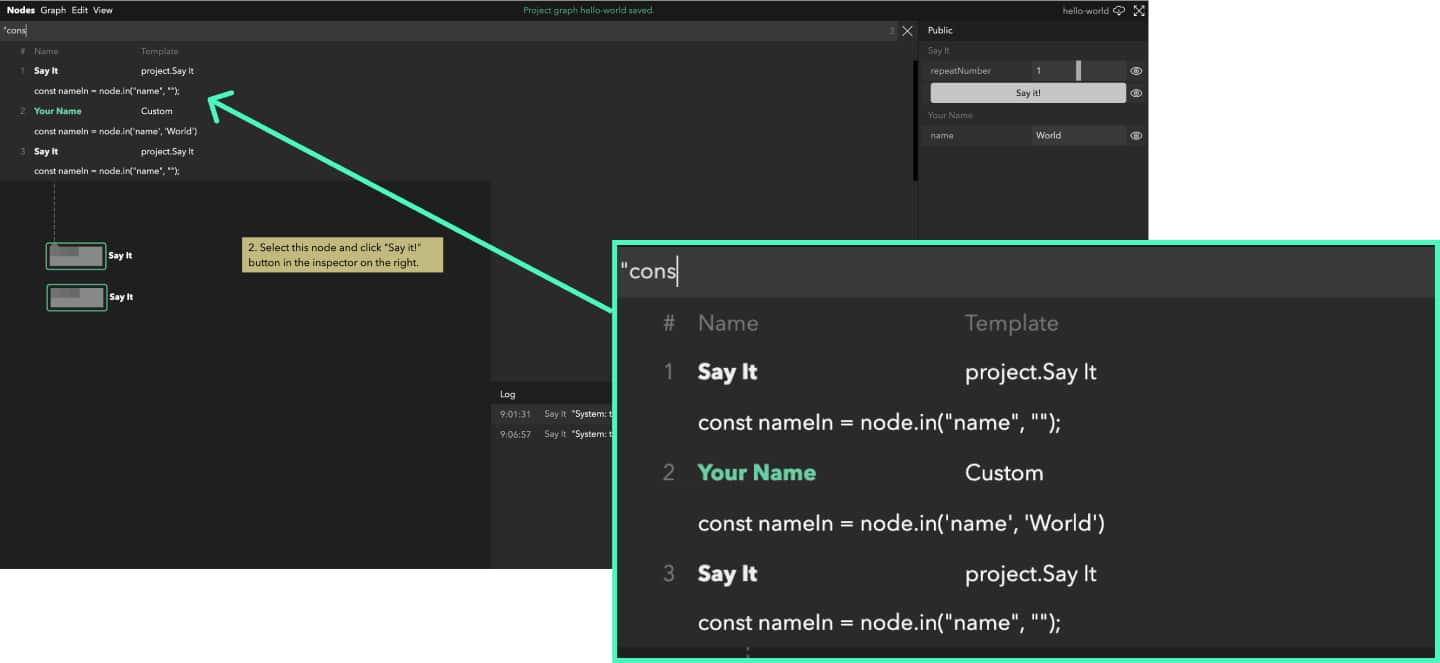
Searching
Open the search box by pressing / and either key in a node’s name or construct a query:
Functionalities
- Search nodes by name
- Search nodes by port name:
port:portName - Search nodes by code:
code:codeTextorcode:"Escaped \"codeText\"" - Search nodes by port value:
value:portValue - Search nodes by comment text:
comment:commentText - Filter nodes by template:
is:templateoris:custom - Filter nodes by error/warning:
has:errororhas:warning
Examples
- Find
Texturenodes with url being ‘test.jpg’:Texture value:test.jpg - Find
Texturenodes with filter ports:Texture port:filter - Find
Texturenodes filtering jpg:Texture port:filter value:jpg - All options:
nodeName is:template has:warning code:"number\"" comment:Value port:name value:jpg
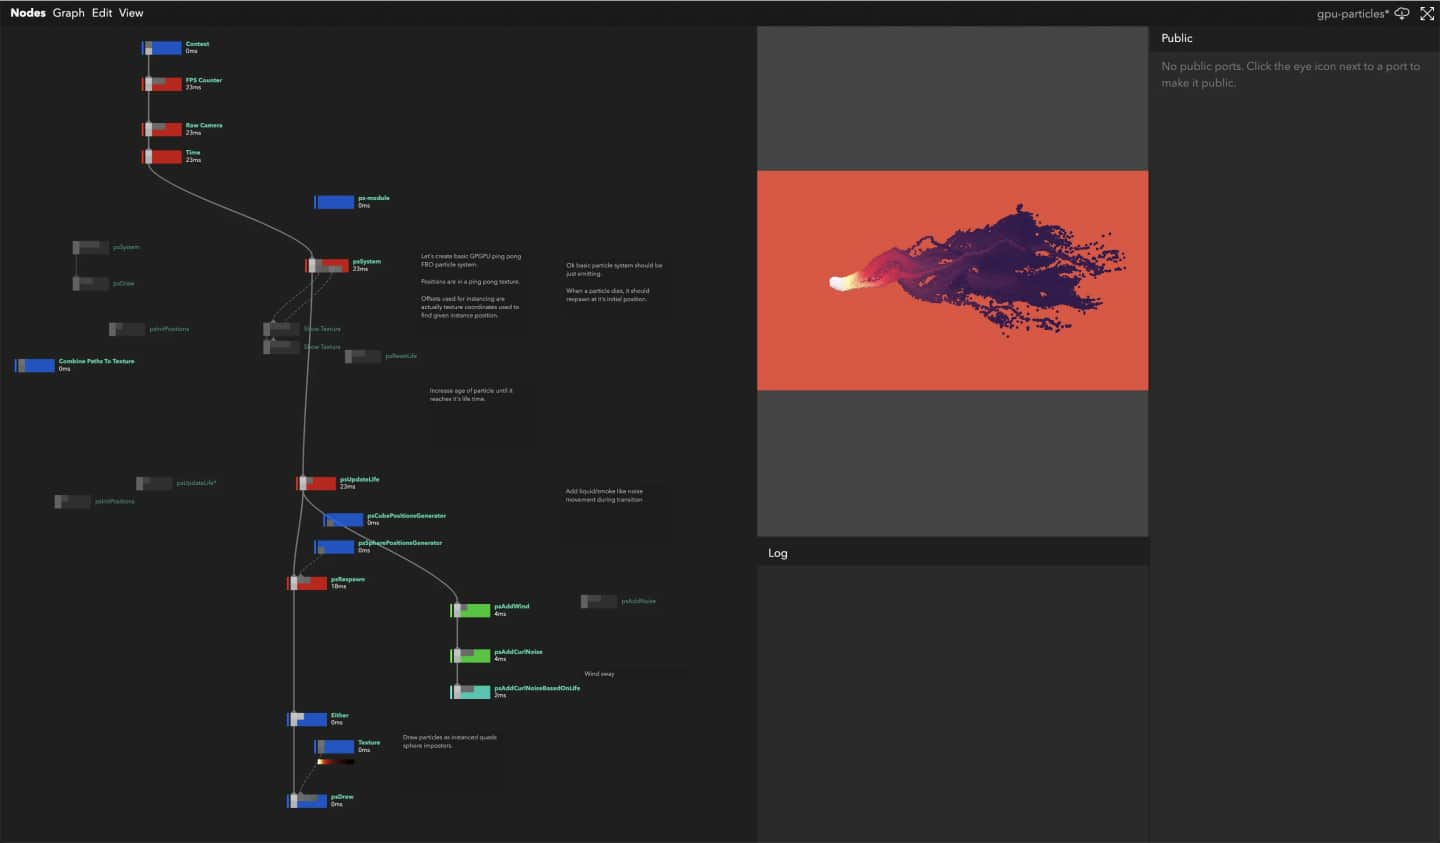
Profiling
Nodes has a built in performance profiler accessible from the Menu Bar under View > Profile. Nodes are enhanced with a cpu time (in ms) comment and different colours based on performance (blue being fast and red being slow).
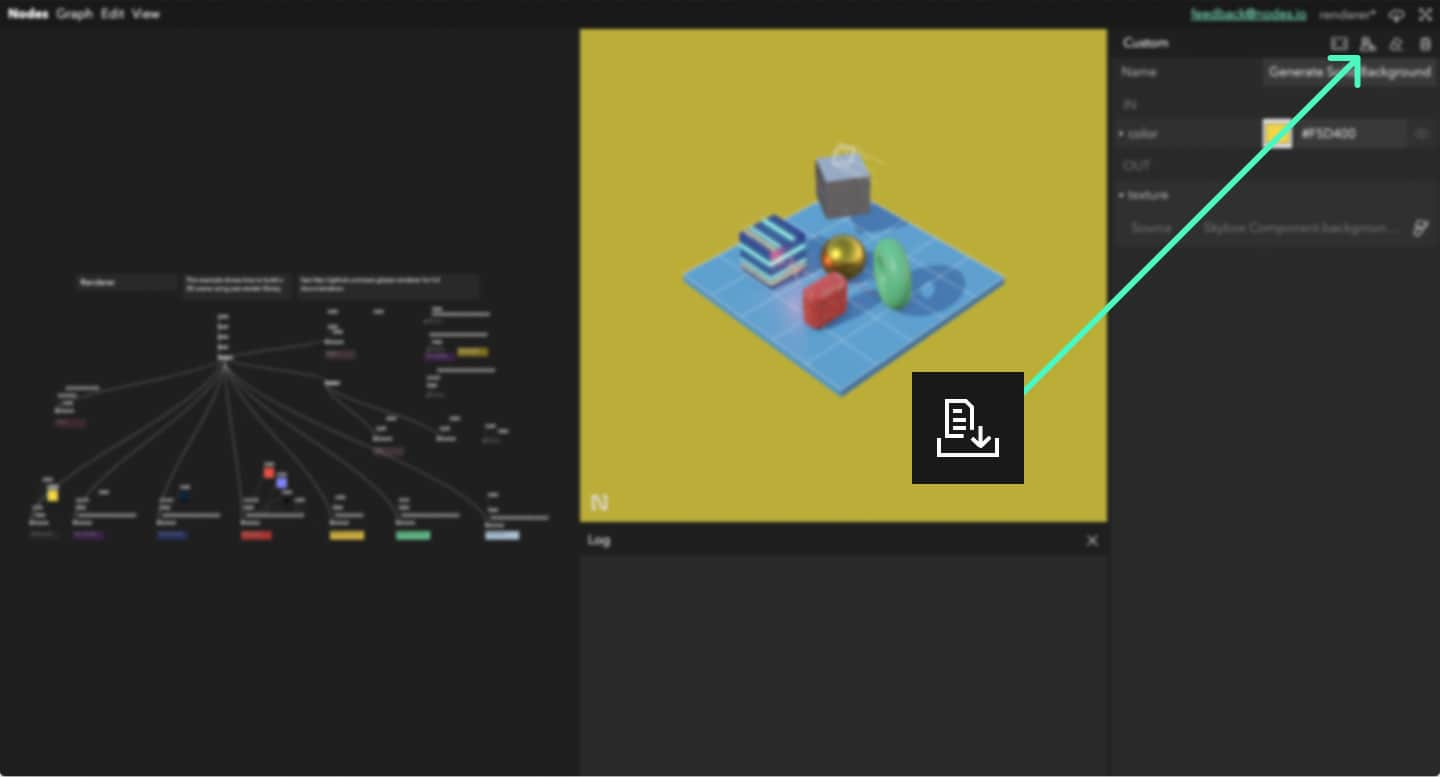
Exporting projects
Projects graph can be bundled and exported to be deployed anywhere. Press the download button in the top right or use the Graph > Export menu for more options.

A message will appear indicating that the graph is being exported and in case of zip export, a dialog box can appear and ask for a location to save the archive. Depending on the amount of dependencies and nodes involved, this can take some time.

For a lighter bundle without the published parameters, go to Graph > Export and choose one of the option without GUI. The option without zip will just export the bundle in a dist folder at the root of the project, ready to be uploaded to a server.
Customisation
Nodes has some customisation options available in Nodes > Preferences.
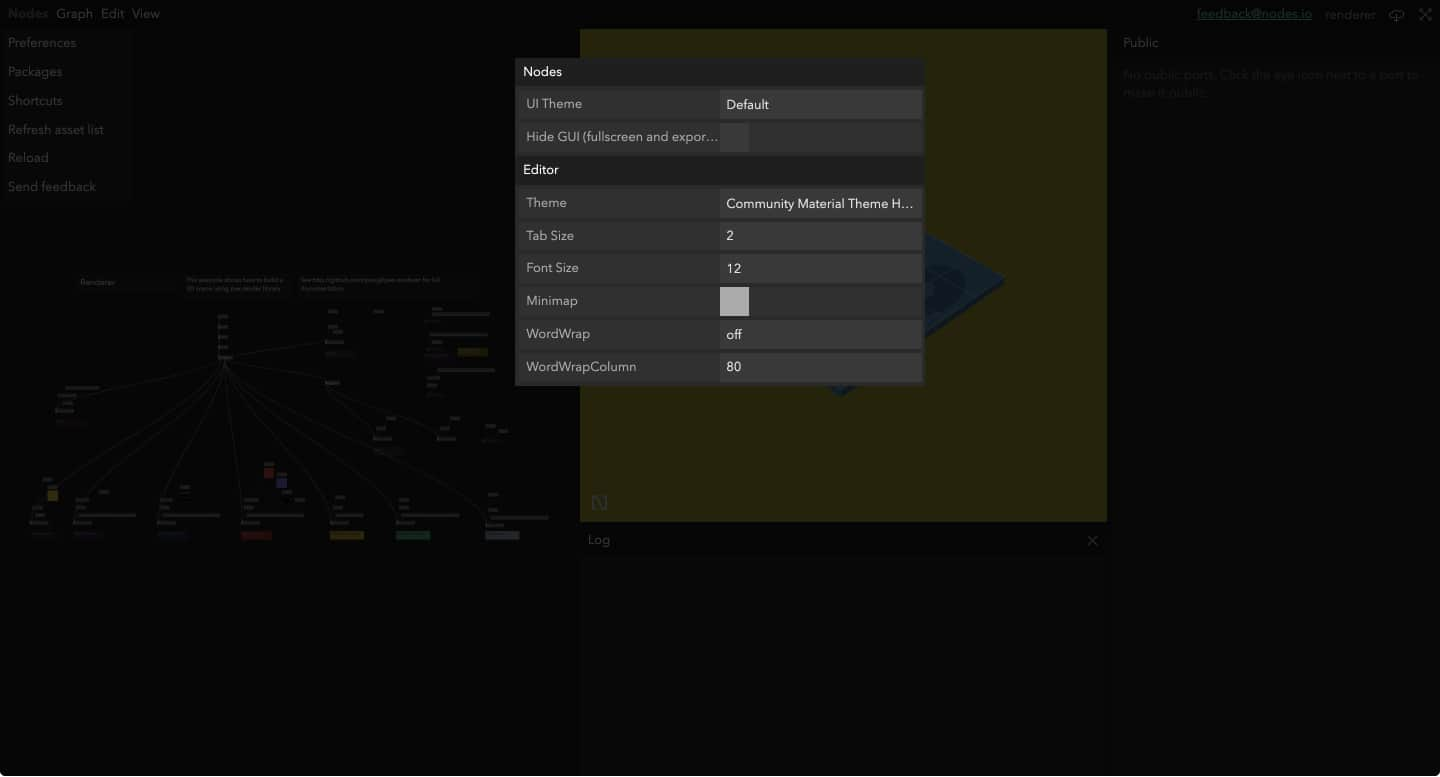
Nodes preferences
- Nodes Theme: change the interface’s colours and opt for a bright or dark theme.
- Nodes Hide GUI: if checked, the GUI in fullscreen and when exported will be initially hidden and only revealed by pressing
G.
Editor preferences
- Editor Theme: change the syntax highlighting of the code editor.
- Editor tab size
- Editor font size
- Editor minimap: enable or disable the minimap on the right of the editor.
- Editor wordWrap: Control the wrapping of the editor. When wordWrap = “off”, the lines will never wrap. When wordWrap = “on”, the lines will wrap at the viewport width. When wordWrap = “wordWrapColumn”, the lines will wrap at wordWrapColumn. When wordWrap = “bounded”, the lines will wrap at min(viewport width, wordWrapColumn). Defaults to “off”.
- Editor wordWrapColumn: Control the wrapping of the editor. When wordWrap = “off”, the lines will never wrap. When wordWrap = “on”, the lines will wrap at the viewport width. When wordWrap = “wordWrapColumn”, the lines will wrap at wordWrapColumn. When wordWrap = “bounded”, the lines will wrap at min(viewport width, wordWrapColumn). Defaults to 80.
Project folder structure
To function correctly, a Nodes project needs a package.json, user.json (gitignored) and a few folders structured as follow:
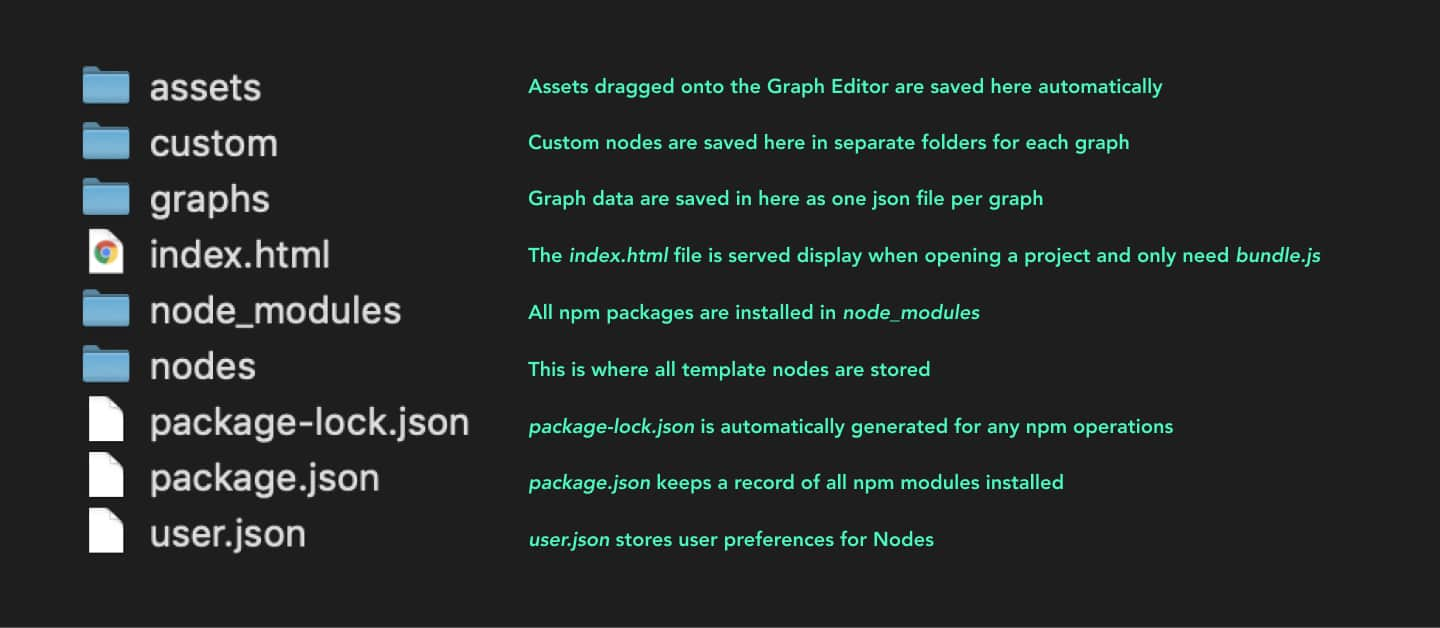
They will be automatically created if missing when opening a project.
Config
Nodes uses cosmiconfig for configuration file support. This means you can configure Nodes via (in order of precedence):
- a nodes property in package.json
- a
.nodesrcfile in JSON or YAML format - a
.nodesrc.jsonfile - a
.nodesrc.yaml,.nodesrc.yml, or.nodesrc.jsfile - a
nodes.config.jsfile exporting a JS object
The options for the configuration file are the following:
interface NodesConfig {
	// The port to serve from.
	port: number;
	// Specify a host to use.
	host: string;
	// Use local ipv4 ip instead of hostname.
	localip: boolean;
	// Serve over https.
	https: boolean;
	// The output directory for exported graph. Default to path.join(process.cwd(), 'dist').
	output: string;
	// Generate index standalone without calling it to be embedded (eg. 'window.myNodesApp').
	standalone: string | boolean;
	// Force building the graph without gui.
	noGui: boolean;
	// Force exporting the graph as zip.
	zip: boolean;
	// Describes the environments you support/target for your project.
	// See https://babeljs.io/docs/en/babel-preset-env#targets
	targets: string | string[] | { [string]: string };

	// Interface specific:
	// Change the font-size of the root element
	fontSize: CSSEm;
	// Change prettier config
	prettier: {};
	// Change eslint config
	eslintConfig: {};
	// Set extra properties for the graph.opts
	defines: {};
}
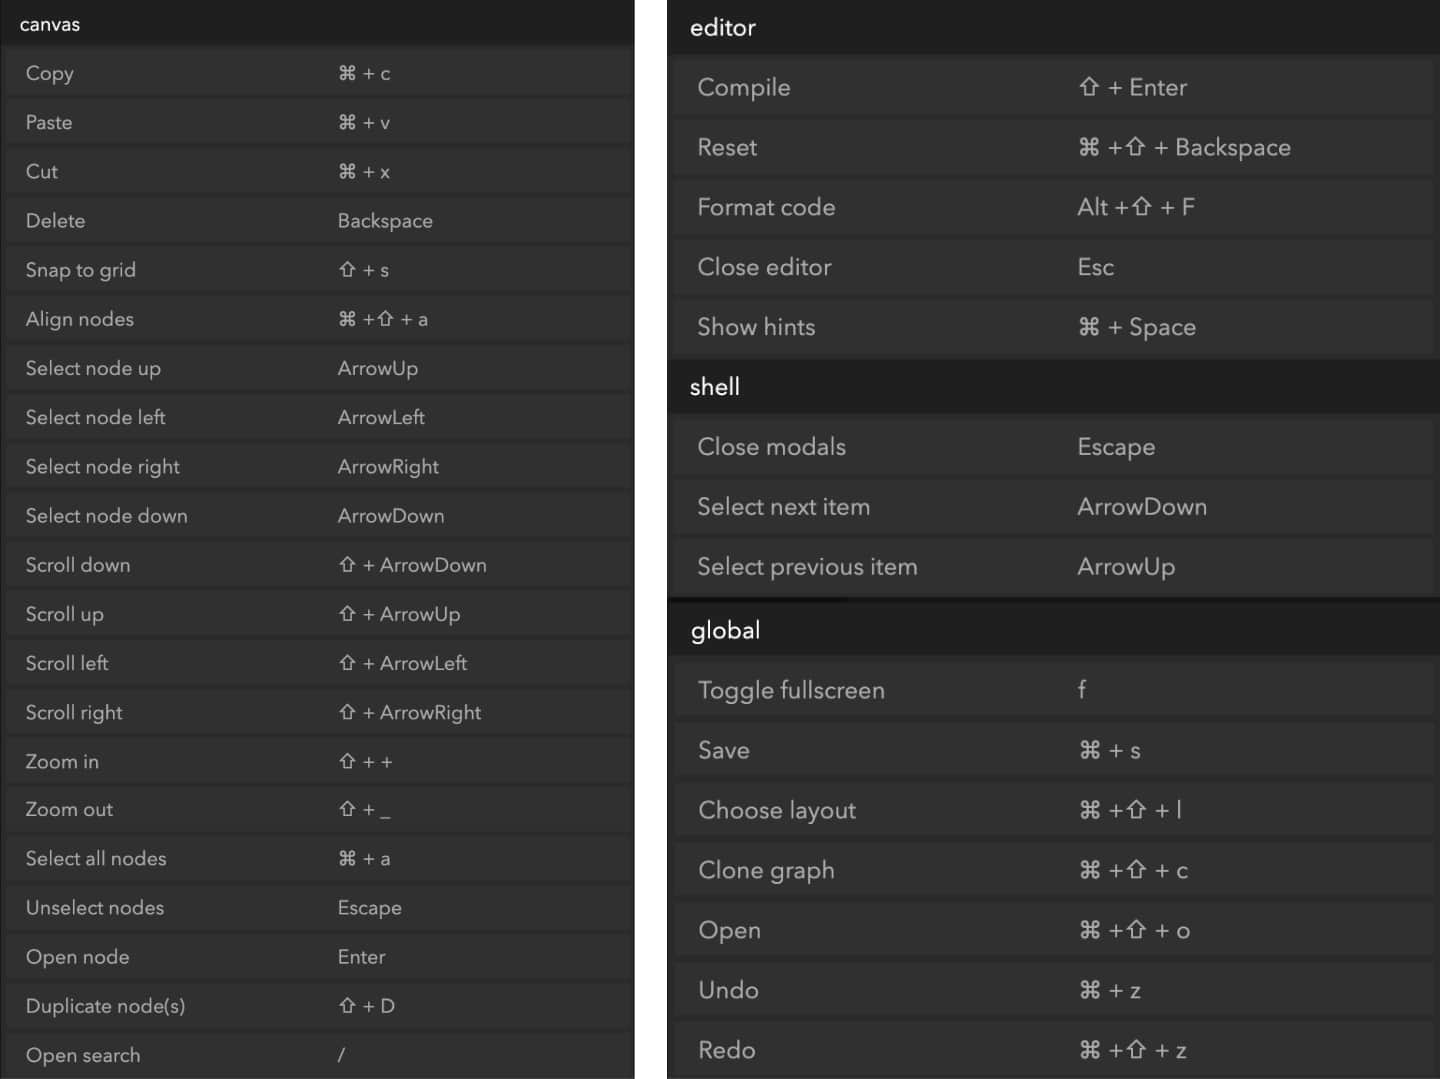
Shortcuts Reference
There are many hotkeys available within Nodes. These can be shown from the shortcuts modal (Nodes > Shortcuts).
Next steps
If something is missing or if you found some part confusing, please file an issue with your suggestions for improvement, tweet at the @nodes_io account or simply drop up a line at hello@nodes.io.